Monday, August 22, 2011

Elaine's Candy Shop Birthday

So my first baby turns 3 today...ahhh! From baby to toddler to preschooler - time goes so fast! She is out celebrating with daddy at the donut shop right now, but we are going to have her big princess party on Saturday with family and friends. So in the meantime I thought I would share some pictures from her Candy Shop birthday party last year. It turned out super cute! We had candy everywhere!
 Colored balls wrapped in cellophane make delicious giant jawbreakers!

I covered paper plates with tissue paper and then wrapped them in cellophane to make giant lollipops.


I made her a tutu and got an iron-on lollipop for her shirt. Too cute!


Such a sweet little birthday girl! Stay tuned for the Princess Party!  

Friday, July 22, 2011

A Little Lemon Cheer


My darling girlfriends and I decided to make this cute lemon wreath from The Adventures of Ordy and Joon. I must admit I was a little skeptical, but I just love how it turned out! So happy and summery hanging in the entryway. I didn't do a tutorial because she did a great job with her's so check it out here . I must say, I spent much less on mine, buying my supplies at The Dollar Tree and Hobby Lobby (under $10). My lemons ended up being smaller, so I just stuck them around however they would fit...not quite so neat and tidy but it works!

Thursday, July 14, 2011

Delicious Raspberry Pie!

Guess what I found happy and ripe in my backyard the other day?! YES beautiful, juicy and delicious raspberries! The first thought that came to my mind when I saw these tasty babies? PIE!! So I picked a bowl full (which took longer than expected because the girls were sneaking berries when I wasn't looking, but who can blame them?!)
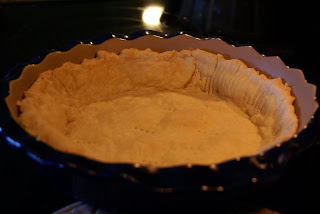
My problem with this plan first came when I realized I was out of shortening for my crust. But I quickly remedied that with an easy internet search for butter pie crust. I found a great recipe here and I went to work...a couple hours later this is what I had:
A sunken, droopy doughy pie crust. I held back my tears of frustration. Got out the butter and sugar and the recipe from Smitten Kitchen and started attempt number 2.  My hard work and diligence was rewarded with this:
NOOOOOO!!!
How could this be??!! Although a little better, by no means worthy of my delicious raspberry filling. It did taste quite good, which made the whole thing all the more maddening.
Why was my crust drooping?
I was now out of butter, completely defeated and still very hungry for raspberry pie. So I stooped below the title of great homemaker (a place where I seem to find myself quite often actually...) and I called my husband and had him pick up a premade pie crust. Desperation drives us to do detestable things. Actually I'm just kidding about that. I think the boughten pie crusts are quite good. I may have saved myself a lot of time and a lot of butter had I just went out and bought the dumb crust in the first place. But no! I've got to try my hand at all that domesticated stuff! Anyways, the pie turned out GREAT! All that I had hoped and more!

Here is the recipe. It's a family friends, tried and true, easy peasy (as long as you aren't me trying to attempt a butter pie crust) sweet and delicious recipe and it's all yours!

Make a 9 inch pie crust and bake. Cool.
Filling:
2 cup water
1/2 cup white corn syrup
1 (3 oz) box raspberry jello
1 pint raspberries (I double this at least...the more the better!)
1 1/2 cup sugar
1/3 cup cornstarch

Combine sugar and cornstarch in a bowl. In a pot cook water, syrup and sugar/cornstarch mixture until thick (will go from white to clear.)
Add jello and let cool.
Mix in berries and pour into shell. Chill. Eat. Enjoy!

Oh, P.S.!! I must not forget to mention that I figured out what I did wrong with my poor, sad crust. It was NOT the recipe FOR SURE!! Just me...as usual. I was baking it in a 350 oven instead of 425. I don't think I had it hot enough and it just kinda slowly melted. So do let me know if you use shortening or butter...or boughten!


Ric Rac and All That!

I found this AdOrAbLe ric rac flower tutorial on Jess's blog: Craftiness is not an Option (you really MUST check it out!) and had to give it a try! I think it's so sweet and it looks cute on a headband or just as a plain clippie. I didn't do a tutorial for this because Jess's tutorial is perfect. Check it out here

I did one little thing differently. I sewed the ric rac on felt,  but I used fabric as the backing to hold the clip. I thought that another layer of felt made the flower too thick. I see the fabric is starting to fray a little so this could be a problem. I'll let you know if I come up with some other brilliant plan. You should let me know as well...

 And how about mad props for the gorgeous model? I had to distract her with food to get her to sit still and leave the thing on for 10 seconds so not the best pic but you get the idea!

Monday, July 11, 2011

My Garden Grew!


We were on vacation all last week. SO FUN! Just look at that happy family:) Well, Vivi doesn't look too happy, and Elaine looks like someone socked her in the eye. Nobody did. She has these HORRIBLE styes that get huge and sore and won't go away. By the time we got home she had them in both eyes. I feel so terrible about it. Anyway, we were pretty happy. And I was even happier when I came home to find that my garden had grown! (As opposed to shriveling up and dying which I thought I might probably do...)

Here are my green beans! They are growing up this big 6 foot trellis we made. It's cute how the vines curl up it.
And how about a green pepper? Can't wait to eat that baby!

  Tomatoes, anyone? Well, not quite yet... but I see some fresh, delicious salsa in their future!
This is the embarrassing part. The overgrown herb garden. I keep getting herbs and planting them but I have really NO CLUE what to do with them and they just keep growing bigger and bigger...and bigger. In fact, basil is pretty much taking over my yard. Seriously. I've been inspired by a friend to freeze them. Hmmm, I do like freezing things...
Here's a fun pretty little thing. Actually, it's quite tall (mmm, 5 feet about). It's blossomed these fuzzy pink flowers. I have no idea what it is. Anybody? Anybody? I bought it a couple years ago when it was dinky and the rabbits kept eating it. I guess they had other tastes this year.
My brother and his wife got me this nice little strawberry grower for my birthday. But, as you can see, no strawberries. Maybe I'll stick some flowers in those little cubbies. 
 So, that's my happy garden!

Monday, July 4, 2011

Crunchy Granola

Happy Fourth of July!
We are heading up to the cabin for the week so I thought I better leave you with something fun, delicious, and even nutritious!

This is the granola I made to bring to the cabin. It was fast and easy to make. It will be a great snacky food. So here's how it's done:

Combine 2/3 cup honey, 1/2 cup veggie oil, and 1/3 cup packed brown sugar in a small sauce pan. Cook and stir until sugar dissolves. Remove from heat and add 2 tsp vanilla.
Meanwhile, in a large bowl combine 4 cup old fashioned oats, 1 cup almond slices, 1 cup coconut, 1 cup salted sunflower seeds. Once stirred up add in honey mixture stirring to coat evenly. Spread out on a cookie sheet and pop it in the oven at 300 for 10 minutes. After 10 minutes add a cup of raisins and stir it up a bit. Pop it back in for 10 more minutes.
When it's done, spread it out on wax paper to cool.
And there you have it. Pretty easy, huh?

Some ideas/tips. If you like a crunchier granola I would recommend using two cookie sheets so it is able to cook a little crisper. You can really add anything to this: flaxseed, crasins, any kind of nut or seed. You could even add dried blueberries after taking it out of the oven. Hmm that sounds good! Let me know what you tried for add-ins!

Thursday, June 30, 2011

Pannekoeken!!!

I made pannekoeken for breakfast this morning so I thought I would share! It is so good! One of my favorites! I actually got the recipe from a childhood friend whose mom used to make it whenever I slept over so it not only tastes good, but it has good memories, too! 
So let's get to it...

Here's what you need:
4 eggs (mine are from my parent's chickens, aren't they pretty?!)
1 cup flour
1 cup milk
1/4 cup butter (or margarine)

Set the oven to 425 degrees for a glass pan or 450 degrees for a metal pan.
Put your butter in the pan and let it completely melt in the oven while it's heating up.


Meanwhile, mix the rest of the ingredients in a bowl. I try to get most of the bumps out of the batter but I don't bother with using a mixer.

 Once ingredients are mixed and butter is melted, pour the mixture in your pan and pop it in the oven for 20 minutes. 


Comes out perfectly every time! It's really big and poofed up when you first take it out, but it quickly deflates...
don't be alarmed!
A little syrup and some fresh fruit is all you need to make this a delicious breakfast!
Enjoy!


Search This Blog